


How to Export Files as SVG in Photoshop:
[su_spacer size=”30″]
A Simple Guide Introduction:
[su_spacer size=”30″]
In today’s digital era, the use of scalable vector graphics (SVG) has become increasingly popular. SVG files offer numerous benefits, such as scalability, small file sizes, and the ability to retain image quality at any size. While Adobe Photoshop is primarily known for its raster-based image editing capabilities, it also provides a convenient way to export files as SVG.
[su_spacer size=”30″]
In this blog, we will guide you through the process of exporting SVG from Photoshop, empowering you to enhance your design workflow and effectively utilize this versatile file format.
[su_spacer size=”30″]
SVG and Its Advantages:
[su_spacer size=”60″]
Before we get into the technical stuff, let’s talk about, what SVG is, why SVG is awesome, and why it is highly regarded in the digital design community.
[su_spacer size=”60″]
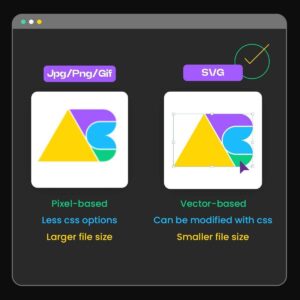
Scalable Vector Graphics (SVG) is an XML-based file format that allows for the creation of two-dimensional vector graphics. Unlike raster images such as JPEG or PNG, SVG files define images with mathematical equations, ensuring that they can be scaled without loss of quality. For example SVGs play a crucial role if you want to create a scaleable logo design
[su_spacer size=”60″]
One of the primary advantages of SVG files is their scalability. This means that whether you need to display an image on a tiny mobile screen or a large billboard, SVGs will adapt seamlessly without pixelation.
[su_spacer size=”60″]
Additionally, SVG files typically have smaller file sizes compared to raster files, making them ideal for web-based applications where loading speed is crucial.
[su_spacer size=”60″]
Moreover, SVGs allow for interactive elements such as animations and interactivity, making them highly versatile for modern web design.
[su_spacer size=”30″]
Also Read: Navigating the World of Scalable Logo Design
[su_spacer size=”30″]
Photoshop export as SVG:
Now that we have established the importance of SVG files, let us explore the step-by-step process of exporting files as SVG in Adobe Photoshop.
[su_spacer size=”60″]
Follow these instructions for how to Export Files as SVG in Photoshop and How to export pictures as SVG in Photoshop.
[su_spacer size=”30″]
Step 1: Open Your Picture
[su_spacer size=”60″]
Start by opening your picture in Photoshop. You can start a new project or use one you already have. Just make sure your picture is made of lines and shapes that we can change specially.
[su_spacer size=”30″]
Step 2: Get Your Picture Ready
[su_spacer size=”60″]
To make sure your SVG turns out great, tidy up your picture. Put all the parts in the right order and give them names. If your picture has words, change them into shapes by clicking on them.
[su_spacer size=”30″]
Step 3: Pick the Parts to Export
[su_spacer size=”60″]
Choose the parts of your picture that you want to turn into an SVG. If you want the whole picture, make sure everything is picked. You can pick more than one thing by holding down the Shift key while clicking them in the Layers panel.
[su_spacer size=”30″]
Step 4: Get Ready to Save
[su_spacer size=”60″]
Now, it’s time to save your picture as an SVG. Go to “File,” then “Export,” and pick “Export As.” A window will pop up.
[su_spacer size=”30″]
Step 5: Make It an SVG
In that window, find a place to save your SVG. Then, in the dropdown menu where it says “Format,” pick “SVG.”
[su_spacer size=”30″]
Step 6: Set Things Up
[su_spacer size=”60″]
Before you click the “Export” button, there are some important settings to look at:
[su_spacer size=”60″]
1) SVG Type: Pick the one that works best for your picture. “SVG 1.1″ is good for most pictures.
[su_spacer size=”60”]
2) Size: If you want your SVG to change size with the screen, don’t put any numbers in the width and height boxes.
[su_spacer size=”60″]
3) Text: If you have words in your picture, choose “Convert to Outlines” so they stay looking right.
[su_spacer size=”60″]
4) Images: Select “Embed” to keep your picture looking like it should.
[su_spacer size=”60″]
5) Compression: Choose “None” to keep things clear.
[su_spacer size=”60″]
6) Extras: Decide if you want to keep things like metadata and extra details in your SVG. You might not need them.
[su_spacer size=”30″]
Step 7: Save Your SVG
[su_spacer size=”60″]
Once you’re happy with your settings, click the “Export” button. You’ll need to give your SVG a name, and Photoshop will save it for you.
[su_spacer size=”60″]
Great job! You’ve turned your picture into an SVG with Photoshop. Now, let’s learn some cool tricks to make your SVGs even better.
[su_spacer size=”60″]
Also Read: Quick Tips to Convert PNG to SVG in Photoshop
[su_spacer size=”30″]
[su_row][su_column size=”1/2″ center=”no” class=””]
Pro Tips for how to export SVG from Photoshop
[su_spacer size=”60″]
Get the Right Size: Before you start, think about how big you want your picture to be. Make your artboard (the space your picture is on) the right size for that.
[su_spacer size=”60″]
1) Turn Photos into Art: If you’re starting with a photo, you can use a program like Adobe Illustrator to turn it into shapes before exporting it to SVG.
[su_spacer size=”60″]
2) Keep Things Organized: Make sure your layers are neat and have good names. It’ll make working with your SVG easier.
[su_spacer size=”60″]
3) Let It Change Size: If you want your SVG to fit on different screens, don’t set a size when you save it. That way, it can be small or big, and still look great.
[su_spacer size=”60″]
4) Check Your SVG: After you make your SVG, open it in a web browser or a program that works with SVGs. Make sure it reflects your design preferences accurately.
[su_spacer size=”60″]
5) Trim the Fat: You can look at the code of your SVG and remove things you don’t need. That makes the file smaller and loads faster.
[su_spacer size=”60″]
6) Try Plugins: There are extra tools you can add to make Photoshop export SVGs even easier. Look for ones that do what you want.
[/su_column] [su_column size=”1/2″ center=”no” class=””]
[/su_column][/su_row]
[su_spacer size=”30″]
Wrap-up:
[su_spacer size=”30″]
Congratulations! You have successfully learned how to Photoshop SVG export in Adobe Photoshop. With our step-by-step guide and these tips, you can turn your art into SVGs that look great on any screen.
[su_spacer size=”60″]
So, don’t be afraid to give it a try and see your creativity shine online and in print.
Making SVGs with Photoshop is a cool way to make your pictures look their best.
[su_spacer size=”80″]